(So, Ben and I did one of the Kick Off bat rep's for the WWPD global Operation Overlord campaign, it got posted up over at their site today! Reposting here. Thanks to Steve, The Signal and the whole WWPD for creating another excellent global campaign! If you're not already signed up head on over and do it!)
It is D-Day, June 6th 1944, 00:16 hours. The British 6th Airborne Division, including D Company of the Oxfordshire & Buckinhamshire Light Infantry, are tasked with seizing a key crossing of the Caen Canal from elements of the 752. Grenadier Kompanie in order to secure one of the few flanking routes available to Germans for counter attack.
Today, as part of the opening moves of the WWPD global Flames of War campaign we proudly present the assault on Pegasus Bridge.
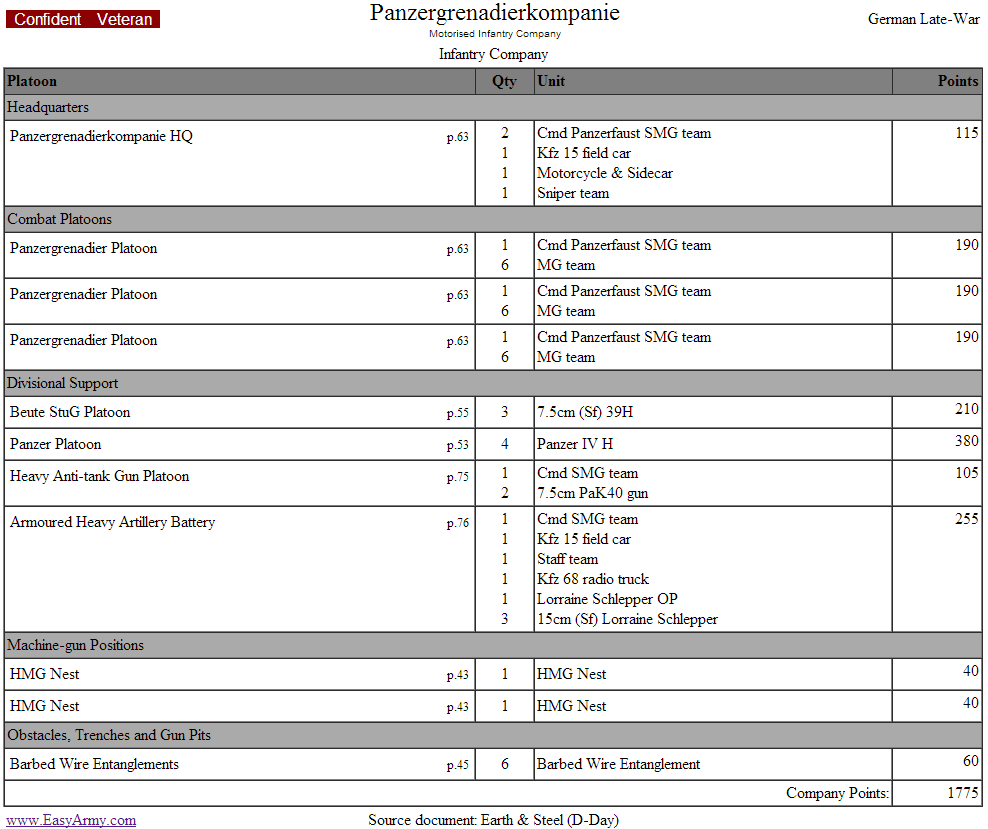
I and my partner in crime Ben decided to fight it out at 1780 points. He'll be running an Airlanding Company from Turning Tide and I'll be running Grenadiers from Earth & Steel. We went with the older books because, at the time we played the scenario, the new versions weren't out yet.
To do the scenario some justice while still making it a competitive fight we decided on a few special rules:
- There are two objectives, one at each end of the bridge. To win, the British, as the attackers, must hold both objectives.
- German units on the map, other than the MG nests, will start bailed out or pinned until turn two.
- The British will start with 6 platoons deploying from the 2 Horsa gliders on their short board edge.
- German and British reserves are both delayed. British reserves, due to the nature of the air landings, have a chance to come in on either short board edge.
- A roll of 1, 2 or 3 will see their reserves coming on from the board edge closest to their Landing Zone.
- A roll of 4, 5 or 6 will see the reserves coming on from the board edge closest to the Sword Beach exit.
- German reserves come on from the Sword Beach exit table edge.
- It is night until turn 5 when, beginning on the defenders turn, a 5+ will end night fight rules.
- The game ends on turn 10
The Map:
The Lists:
British Airlanding company will start with 4 Airlanding Platoons, 1 Pioneer Platoon and a Recce Platoon on the table:
The German Grenadier Kompanie will begin will all units on the table except for the Panzer IV's. German Units are pinned down or bailed out until turn 2.
Both Ben and I did our best to put together some historically accurate lists and, personally, I'm chomping at the bit to try out some of those Rommel's Zirkus vehicles like the Lorraine Schlepper's and the 38H's.
Check out the whole fight after the break!
Board beauty shots:
 |
| Paper terrain turned out great! I took us about 7 hours to put together. It's by Toshach Miniatures |
 |
| The board also features the famous Lukage and buildings by Battlefront and Kerr & King |
 |
| Funny story about that crashed Kubel Wagon. The commander of the local garrison actually died that night in a Kubel Wagon crash, rushing back to the site of the action. |
 |
| Cafe Gondree across the canal. |
Turn 1
 |
| Under the cover of darkness the Ox's & Buck's execute a perfect glider landing. |
 |
| Quickly moving towards the bunker and the first bridge objective. |
 |
| Startled by the noise of the glider landings, the small German holding force rubs the sand out of their eyes. |
 |
| Fire from the platoons pins both nests. |
 |
| The Brits quickly up the action |
 |
| And easily overcome the near side nest. |
 |
| The 2iC fights alone, looking for a Victoria Cross, he assaults the second nest by himself. |
 |
| And takes it out. |
Turn 2
 |
| Consolodating on their quick victory, the Brits begin to move across the bridge |
 |
| Moving towards the key objective on the opposite side. |
 |
| After hearing the noise from the other side of the bridge, one Platoon wakes and begins to make it's way out of their billets and towards the sound of the guns. |
 |
| A sniper, napping in the farm near the East House, wakes |
 |
| The Lorraine Schlepper's & PaK 40's all shake off the night and quickly hop into the actions, along with one of the 39H's |
 |
| First platoon runs to reinforce the eastern edge of the bridge. |
Turn 3
 |
| The troops rush across the bridge |
 |
| As one platoon digs in on the western bank. Due to the night fight rules, and Ben's smarts, he decided not to shoot so he would remain concealed. |
 |
| Two more German infantry platoons wake up and rush out of the houses. |
 |
| 3rd Platoon sweeps around to the flank with the second 39H to wake. |
 |
| While 2nd Platoon moves to set it self up as a blocking force across the road to Sword beach. |
Turn 4
 |
| Ben gets his first reserves in, 6 Lbr's. |
 |
| As the first Pioneer platoons makes it's way forward in an attempt to quickly seize the other end of the bridge |
 |
| And the rest of the infantry piles up behind. (note, we agreed that due to the width of the bridge, you could fit 2 medium bases side by side) |
 |
| The flamethrower opens up on the German Platoon and score's 1 kill, pinning the grenadiers. |
 |
| The Pioneers move in for the Assault! |
 |
| And an unbelievable streak of luck for the Germans begins as they score 5 hits on defensive fire. |
 |
| And the brits lose 3 stands, getting pushed back |
 |
| The pio's over to consolidate on the objective. |
 |
| The Germans capitalize on the British misforture and rush across the street to take up defensive positions. |
 |
| As the 3rd platoon continues its flanking maneuver. |
 |
| Seeing more British moving across the bridge, the Grenadiers open fire |
 |
| and Gut the pioneer platoon before they have a chance to dig in. All that is left are the companies 1iC and 2iC, in a very vulnerable situation. |
 |
| The Schleppers open up on the bridge, scoring 2 more kills. |
 |
| As the 2iC finally leaves his French Frauline's warm bed to join the action. |
Turn 5
 |
| An airlanding platoon joins the fray from the British side of the table. |
 |
| The brits continue their push into the meat grinder. |
 |
| 39H's, Pak 40's and MG teams all attempt to open up on the oncoming brits, but night stymies many of the shots. |
 |
| British airborne recce moves up to support the isolated 1 and 2ic. |
 |
| As the germans set up their flank defense. |
 |
| Continue their bombardment |
 |
| And are heartened by the sight of 4 Panzer IV's joining the fight. |
Turn 6
 |
| But! 2 more british reserve platoons arrive. Commando's and an Airlanding platoon are hot on the heals of the Pazner IV's. |
 |
| The Glider platoon moves up to the objective. |
 |
| As another platoon rushes across the bridge. |
 |
| And the reserves do their best to make it into the fight. |
 |
| A flamethrower, hiding behind the hedges cooks up on the Panzer IV's |
 |
| Forcing 3 to be unable to participate in defensive fire! The Brits assault, killing 1 tank |
 |
| And the Pz IV's fall back! |
 |
| Unlike the historical action, these Panzers stay around though. |
 |
| The Sun Rises over Benouville and the Bridge. |
 |
| An overview of the action in the middle of turn five. Some strange creature is sighted in the water. |
 |
| The Grenadiers dig in. |
 |
| The 3 Pz Iv's move in to take on the Commando's and Glider teams |
 |
| Scoring 2 kills |
 |
| Artillery opens up on the bridge, doing no damage but pinning the advancing platoon. |
 |
| The Germans open up on the advancing Brits |
 |
| And nearly eliminate the platoon (there's 1 rifle team left behind that tree) |
Turn 7
 |
| The short platoon of Pioneers comes on from the Sword Beach exit. |
 |
| As the traffic jam on the bridge continues |
 |
| The Brits move in on the support elements of the German army, threatening the artillery, the Pak's and the Pz's! |
 |
| Pioneers assault the Panzers! |
 |
| And take out 2! |
 |
| The 4th moves back and makes its morale test. |
 |
| The 2iC, still bucking for that Victoria cross assaults the observer, staff team and command team in the farm house! |
 |
| And pushes them out! |
 |
| The Ox's assault the Schleppers! |
 |
| But are pushed back by withering defensive fire. |
 |
| The commando's assault the Pz IV and the 39H |
 |
| Losing 1, scoring no hits in the assault and falling back without killing the (still) sleeping crew of the 39H |
 |
| Elements of the second Grenadier platoon shift over to provide covering fire for the Arty and AT assets. |
 |
| While the arty, threatened from the rear (natch) and under fire, keeps up the barrage on the bridge. Taking out more airlanding rifle teams. |
 |
| The PaK's whip around and score another kill on the Glider Platoon |
 |
| As 2 grenadier teams attempt to take out the remnants of the Glider platoon floundering on the eastern side of the bridge. |
 |
| They lose 1 team to defensive fire! |
 |
| And both are killed (along with 1 british team) in the melee. |
 |
| The situation to the German rear is starting to look grim. |
Turn 8
 |
| Action at the beginning of Turn 8 |
Turn 8
|
| Action at the beginning of Turn 8 |
 |
| Brit's grimly continue to cross the bridge. |
 |
| As one of the recce elements attempts to snipe some germans. |
 |
| And the 2iC continues his heroic trek to link up with the rear elements. |
 |
| British fire bails one of the Schleppers |
 |
| As the Glider troops move up to the East House to set up a 3rd assault |
 |
| 2 teams go in |
 |
| And suffer withering defensive fire |
 |
| And fall |
 |
| Commando's attempt another assault on the Pz IV and the (now awake) H39 |
 |
| But they are also pushed back |
 |
| with 3 more stands lost |
 |
| The 2 iC assaults the Schlepper command team and makes it through the defensive fire! |
 |
| He takes out the team |
 |
| The Schlepp's move to respond |
 |
| And end him |
 |
| But their losses force them to flee the field! (I nominate that 2iC unit for a posthumous Victoria Cross, that 3 assaults 2 successful against a nest, 3 teams in a building and an artillery battery) |
 |
| Fire from the Glider platoons forces the first German Grenadier platoon to Flee! |
 |
| 3rd Platoon moves up into the carnage to take their position. |
 |
| As the 39H's prepare to defend against the Commando's. |
 |
| And the remaining Pz IV backs off. |
 |
| 3rd Platoon assaults |
 |
| Killing 2 teams and... |
 |
| Forcing the remnants of the glider platoon to back off. |
Turn 9
 |
| More brits (the last platoon on this side of the board) come across |
 |
| As the Glider troops move against the PaK's |
 |
| As do the commando's |
 |
| Together their fire wipes out the platoon! |
 |
| Action, Mid-Turn 9. The carnage mounts. |
 |
| Grenadiers open fire on the advancing Glider platoons |
 |
| Killing all but 2 stands |
 |
| As the 3rd platoon does the same on the Bridge Glider troops |
 |
| Also killing 2 stands. With 1 turn remaining, a bloody stalemate seems imminent. |
Turn 10
 |
| One of the remaining single team platoons, fails its morale test and books it off the table. |
 |
| As the Glider troopers move for a final assault against the East House |
 |
| And the small glider team does the same against the Grenadiers in the rear. |
 |
| And the commando's move up the road. |
 |
| A PIAT scores the kill on the last Pz IV! |
 |
| And the Glider troop assaults! |
 |
| Taking awful defensive fire. |
 |
| But not losing a team, they move back. |
 |
| Recce assaults the rear Grenadiers |
 |
| And also takes a punch to the face |
 |
| Getting bailed |
 |
| But the small glider platoon successfully makes it into contact |
 |
| They kill 2 teams and force the 3rd to move back! |
 |
| The 39H's move up and open fire on the Commandos |
 |
| Killing 3 teams. |
 |
| The Grenadiers open up on the short Glider platoon |
 |
| And finish it off. |
 |
| The rest of the Grenadiers at the East House open up on the final bridge Glider Platoon |
 |
| And savage it as well. |
 |
| All available teams open up on that last dug in team near the objective, but fail to score the kill! |
 |
| And with that, the game ended. There was no clear result and ended up a 3 to 3 draw. I had killed 3 of Ben's platoons (1 Pio and 2 Glider Platoons) and Ben had killed 4 of mine (1 Grenadier, Pz Iv's, PaK 40's and Schleppers) |
 |
| The final carnage at the East House. |
Of course, we've all seen the movie and we know what happens next...
 |
| "We're never going to make it... Wait... What's that?" |
 |
| You are relieved. |


No comments:
Post a Comment